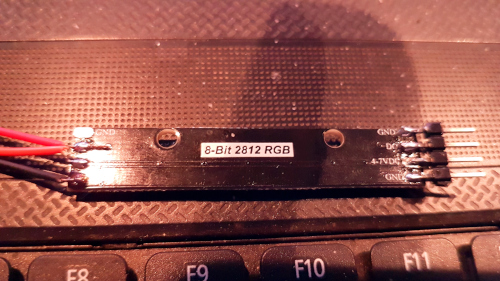
In acest articol vom folosi o banda led cu 8 leduri adresabille WS2812.
Acestea se alimenteaza cu +5V iar comanda acestor leduri se face pe un singur pin.
Acest pin de comanda a tuturor ledurilor va fi conectat la pinul D7 al Arduino.
Modulul are un pret de 6 lei si se poate cumpara de aici.
Poze cu acest modul sunt mai jos:

In primul sketch folosit am simulat functionarea unui semafor. Codul este mai jos:
#include <FastLED.h>
#define PIN_LED 7
#define NUM_LED 8
#define STRALUCIRE  10
CRGB leduri[NUM_LED];

void setup() {
  FastLED.addLeds<WS2812, PIN_LED, RGB>(leduri, NUM_LED);
  FastLED.setBrightness(  STRALUCIRE );
}

void loop() {
  semafor1();
  delay(3000);
  semafor2();
  delay(1000);
  semafor3();
  delay(3000);
  stingere();
  semafor2();
  delay(500);
  stingere();
}

void stingere(void) {
  for (int i=0;i<NUM_LED;i++) {
    leduri[i] = CRGB(0,0,0);
    FastLED.show();
    delay(10);
  }
}

void semafor1(void) {
  leduri[0] = CRGB(0, 255, 0);
  FastLED.show();
  delay(5);
  leduri[1] = CRGB(0, 255, 0);
  FastLED.show();
  delay(5);
  leduri[2] = CRGB(0, 255, 0);
  FastLED.show();
}

void semafor2(void) {
  leduri[3] = CRGB(255, 215, 0);
  FastLED.show();
  delay(5);
  leduri[4] = CRGB(255, 215, 0);
  FastLED.show();
}

void semafor3(void) {
  stingere();
  leduri[5] = CRGB(255, 0, 0);
  FastLED.show();
  delay(5);
  leduri[6] = CRGB(255, 0, 0);
  FastLED.show();
  delay(5);
  leduri[7] = CRGB(255, 0, 0);
  FastLED.show();
}
In urmatorul sketch am folosit alocarea in mod aleator a culorilor fiecarui led. Codul rezultat este cel de mai jos:
#include <FastLED.h>
#define PIN_LED 7
#define NUM_LED 8
#define STRALUCIRE  10
CRGB leduri[NUM_LED];

void setup() {
  FastLED.addLeds<WS2812, PIN_LED, RGB>(leduri, NUM_LED);
  FastLED.setBrightness(  STRALUCIRE );
}

void loop() {
  aleator();
  delay(300);
  stingere();
  delay(100);
}

void stingere(void) {
  for (int i=0;i<NUM_LED;i++) {
    leduri[i] = CRGB(0,0,0);
    FastLED.show();
    delay(10);
  }
}

void aleator(void) {
  for (int i=0;i<NUM_LED;i++) {
    int random_r = random(0, 255);
    int random_g = random(0, 255);
    int random_b = random(0, 255);
    leduri[i] = CRGB(random_r,random_g,random_b);
    FastLED.show();
    delay(50);
  }
}
Mai departe am creat un numarator cu cele 8 leduri, sketchul folosit fiind urmatorul:
#include <FastLED.h>
#define PIN_LED 7
#define NUM_LED 8
#define STRALUCIRE  10
CRGB leduri[NUM_LED];

void setup() {
  FastLED.addLeds<WS2812, PIN_LED, RGB>(leduri, NUM_LED);
  FastLED.setBrightness(  STRALUCIRE );
}

void loop() {
  numarator();
  delay(1000);
  stingere();
  delay(1000);
}

void stingere(void) {
  for (int i=0;i<NUM_LED;i++) {
    leduri[i] = CRGB(0,0,0);
    FastLED.show();
    delay(10);
  }
}

void numarator(void) {
  leduri[0] = CRGB(0, 255, 0);
  FastLED.show();
  delay(1000);
  leduri[1] = CRGB(0, 255, 0);
  FastLED.show();
  delay(1000);
  leduri[2] = CRGB(0, 255, 0);
  FastLED.show();
  delay(1000);
  leduri[3] = CRGB(0, 255, 0);
  FastLED.show();
  delay(1000);
  leduri[4] = CRGB(0, 255, 0);
  FastLED.show();
  delay(1000);
  leduri[5] = CRGB(255, 215, 0);
  FastLED.show();
  delay(1000);
  leduri[6] = CRGB(255, 215, 0);
  FastLED.show();
  delay(1000);
  leduri[7] = CRGB(255, 0, 0);
  FastLED.show();
  delay(1000);
}
Iar in loc de incheiere am scris un cod care simuleaza luminile unui autovehicul de politie:
#include <FastLED.h>
#define PIN_LED 7
#define NUM_LED 8
#define STRALUCIRE  10
CRGB leduri[NUM_LED];

void setup() {
  FastLED.addLeds<WS2812, PIN_LED, RGB>(leduri, NUM_LED);
  FastLED.setBrightness(  STRALUCIRE );
}

void loop() {
  police_red();
  delay(100);
  stingere();
  delay(100);
  police_red();
  delay(100);
  stingere();
  delay(300);
  police_blue();
  delay(100);
  stingere();
  delay(100);
  police_blue();
  delay(100);
  stingere();
  delay(300);
}

void stingere(void) {
  for (int i=0;i<NUM_LED;i++) {
    leduri[i] = CRGB(0,0,0);
    FastLED.show();
    delay(5);
  }
}

void police_red(void) {
  leduri[0] = CRGB(0, 255, 0);
  FastLED.show();
  leduri[1] = CRGB(0, 255, 0);
  FastLED.show();
  leduri[2] = CRGB(0, 255, 0);
  FastLED.show();
  leduri[3] = CRGB(0, 255, 0);
  FastLED.show();
}

void police_blue(void) {
  leduri[4] = CRGB(0, 0, 255);
  FastLED.show();
  leduri[5] = CRGB(0, 0, 255);
  FastLED.show();
  leduri[6] = CRGB(0, 0, 255);
  FastLED.show();
  leduri[7] = CRGB(0, 0, 255);
  FastLED.show();
}
Un filmulet cu cele 4 coduri folosite in acest articol este mai jos: